|
05/20/10

 |
|
|
|
|
|
Note The
battery connector is now mounted from the back side of the
helicopter LG and
the battery is under slung from under the front
strut and on an angle, into the inside front end of the canopy.
Assembly photos shows this more in detail.
|

- IMPORTANT! DO NOT ATTEMPT TO
REMOVE PARTS FROM PARTS TREE BY HAND!
- AS YOU WILL RISK BREAKING
SOME OF THE PART FEATURES NECESSARY FOR MOUNTING.
-
- Before you begin, please also read the
MIA
Kit Intro
completely. Make sure you are comfortable with
the assembly and tools required. This is not a hard assembly but
as with any hobby which requires user involvement, it requires
careful reading and patience. You do this and you too will end up
with an awesome Scale S300 for your mSR, mCX2 or Solo tiny
helicopter. If you need further assistance you can also
Email us and we will help you.
Q
Will this frame work with
older version mCX helis?
A Yes
but you will need to use 150 mah battery with such to boost the
power requirement for scale flight. If you are in doubt of
diminished flight times with your "older" mCX helicopter please
purchase the older version kits for such, under our mCX Upgrades
page. These were designed strictly for the older mCX with smaller
diameter skids and boom. In contrast, the 2010 S300 kits have wider
diameter skids, boom and slightly different frame arrangement.

Stock
Helicopter Preparation
-
mSR
-
1
Carefully remove the stock LG. -
2 Disconnect
the small tail motor connector from the 4 in 1 controller.
3
Uncoil the wires with the connector from the
canopy support arm.
4
Gently fold the wires towards the back of the
stock carbon boom
5
Firmly grab the boom and connector
wires between your index and thumb fingers near the read frame
boom socket, while holding the heli frame with the other hand,
pull gently, the boom assembly will pull out of the frame rear
socket.

-
mCX and mCX2
-
-
1 Carefully remove
the stock LG.
-
2 Firmly
grab the boom between your index and thumb fingers near the read frame boom socket, while holding
the heli frame with the other hand, pull gently, the boom assembly
will pull out of the frame rear socket.

-
Solo
-
-
1 Carefully
unsolder the battery connector wires to the controller board. Keep track of where the red and black wires go
before removal. Mark the Red + , Black -.
-
2
With the wires disconnected from the controller, gently remove the
stock LG.
-
-
You have tow options at
this point:
-
-
A cut
the plastic battery connector from the LG and re-solder the
connector wires
- to the controller marked + and -. This allows
you to use the stock Solo battery.
-
B Solder
a universal mSR battery connector red and black wires to the
controller + (Red),
- - ( black). This allows you to use the
more universal mSR battery types with the solo.
- Recommended option as this makes easier if you
have both Nine Eagles Solo and E-Flite mSR-mCX2 brand helis and you
can swap batteries back and forth, easily.
-
-
Note
Because the Solo helicopters already have an angled boom, a la
S300 style, we
recommend the S300 alu boom and supporting fiberglass brackets not
be used, to save on weight. Use only the S300 LG assembly and
keep the tail stock.
-
- However, if you feel comfortable experimenting
a bit and modifying the boom support brackets slightly then,
follow same install procedure for the mSR. The mounting of the
fiberglass S300 boom support brackets to the canopy support arm
will not be the same on the solo as it is on the mSR-mCX you
can trim these upper ones and leave only the boom supporting
brackets, or leave the boom brackets out completely, since the
stock Solo angled boom will already support the S300 aluminum boom
only using the rubber boom support piece.

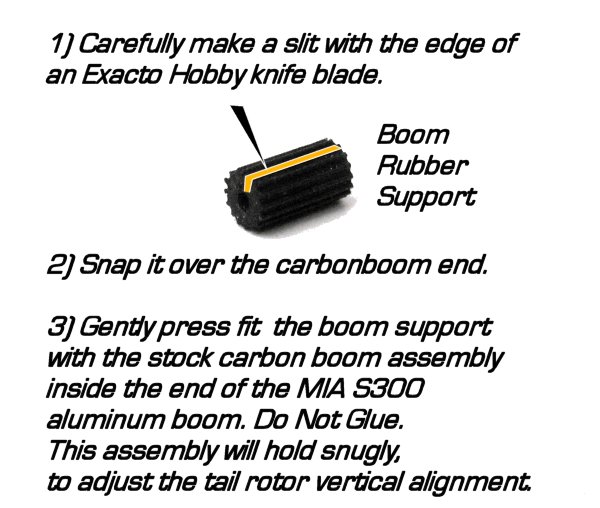
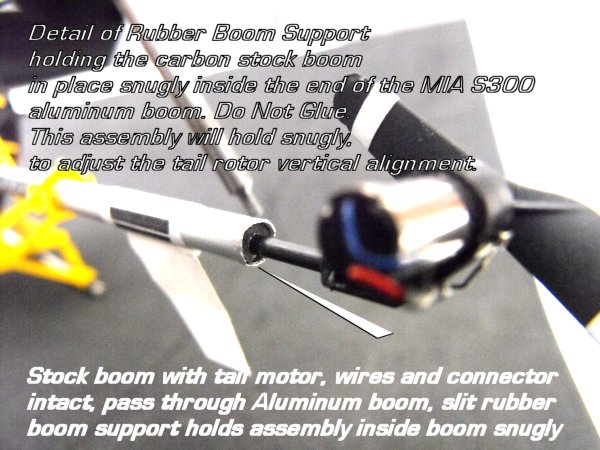
Reinstalling the boom assembly with the S300 aluminum boom
- Note that you will pass the entire stock carbon
boom, wires and connector as an entire assembly, beginning with
the connector, through the new
S300 aluminum boom, which has been sized accordingly to allow ease
of installation, as described. Do this carefully so not to scratch the enamel
on the wires. Once this is done the stock boom will stick out of
the aluminum boom a small distance at the front to safely keep the mSR tail rotor wires intact. Make sure you coil the connector
wires back, as in the stock setup, when you get to that point.

-
Removal
of parts from parts tree Procedure:
-
-
1 Carefully
and gently "score" all part supporting "bridges" with a hobby
knife.
- Do not Try to cut all in one shot! this
is just as a guide for the next steps and to provide a clean cut.
-
2 Using
a small hobby scissors cut around the parts near the supporting
bridges. This is required for professional results.
-
3 Using
a small hobby scissors cut the bridges off at the "score" marks.


-
Installation of Aluminum Skids
-
-
1 Once
the main LG Strut supports and battery horizontal plate are
assembled,
- carefully insert the skids with retainer
O-rings through the LG strut support skid holes.
-
-
2 Align
the skids making sure they are true and squared, the O-rings
typically hold the
- skids in place snugly, but for a permanent
installation place a tiny CA drop in between
- the O-Ring and Strut Support, skid to lock the
skids in place. Take your time so you obtain
- a professional looking assembly. Study the
photos to guide you as reference.
|
|
Note
Before CA gluing the boom
bracing to the LG assembly, test fit the install using the
stock frame canopy rear support bar . Once this
is set, fix the boom assembly to the LG
base with CA glue as shown in photos. The
Actual real S300 has a specific angle to the
boom in reference to the cabin, it angles
slightly up at the rear, this is natural.


Note Push
the end of the boom assembly all the way until the tail rotor
plastic mount makes contact, flush, with the edge of the aluminum
boom.
-
-
-
Installation of complete assembly to stock helicopter mounting
posts
Installation of complete MIA S300 LG-Boom
assembly to the stock Helicopter frame LG mounting posts, should
be snug, if the helicopter frame is fairly new and you have not
gone through several LG replacements. However if for some reason
it is not, you can tighten the fit by smearing a bit of CA glue
around the fiberglass strut support mounting pegs, to thicken
them up a bit. Do this in small and careful steps to avoid
excess CA glue build up. Test it, repeat if required.
-
-
Detailing the S300 Canopy
The canopy kit is supplied with printed vinyl
decals with color trim strips and logos. A couple tail molded
fins, same color as canopy, are also included for extra realism.
Make sure your hands are clean and dry when working with decals.
1
Carefully cut the trim color strips in segments.
-
-
2 Remove
the protective decal backing, by gently pricking with a pin or
edge of a hobby knife the backing material and peel off the
vinyl decal from it.
-
-
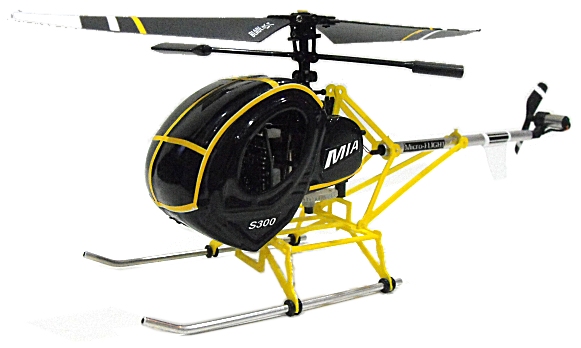
3 Apply
decals strips and logos using the photograph below as
reference. The vinyl decal material is repositionable, if you
make a mistake, you can redo it with ease. To apply trims around
curves, gently stretch the vinyl strips around the curve as you
apply to canopy with gentle finger pressure.
4
Installation of tail molded fins is simply
done using small pieces of Scotch clear tape to "clamp" the fins
around the boom tail end section.
-

-
Lighting is
optional. However, if you wish to light up your scale model, we recommend you purchase a set of lights from Tiny Brite Lights and install them according to their supplied
instructions. Use the following photo as reference for location
of lights, or install
- as you wish. A flashing white light
(not visible on this photo) is typically mounted at the boom
rear end. Red is for (Right) and Green is for (Left) with view
of helicopter coming towards you. Use only 3 lights, to
keep heli from additional weight.
|
|
|
|